
How To Downgrade Lenovo P780 To Jelly Bean From KitKat
After Lenovo P780 has launched KitKat people become very happy that they got an updated Android version, but after a few days people complaining about its bugs. Still now lenovo provided S226 update but many people have a network problem, battery issue bla bla. So I am going to suggest you that if you are frustrated with KitKat that it’s time to downgrade your lenovo P780 ROW to Jelly Bean from KitKat.
Advantage of Downgrading to Jelly Bean from KitKat with this method
- No Root required
- No Warranty violation
- Stock Recovery, mean you will bring back your device like factory condition
Before we are going to start our process, please read the whole article carefully. And do it carefully. But still do it at your risk. We are not responsible for any kind of damage. Let’s start.
The tools you need to download:
- All MTK USB Driver 2014.rar (Windows 7 recommended)
- SP Flash Tool
Now unrar these files.
Download Stock ROM ( The Raw Material)
Download Stock ROM according to your device. If its 4GB version, then download the 4GB version ROM. Vise versa. Don’t try to install 4GB version ROM on 8GB version device. Vise versa.
- 4 GB Version ROW ROM P780_ROW_S123_131231.rar (652MB) (This stock ROM for ROW Device )
- 8 GB Version ROW ROM P780_8GB_S119-ROW.rar (628MB) (This is stock ROM for ROW Device)
Check Your Lenovo P780 ROW manufacture date
Please check your manufacture date of your Lenovo P780. You can check it from the box pack. Now if your device is manufactured after April, 2014 then you have to use a new preloader. To use it just download the zip ( Download New_Preloader1.zip ). Unzip it, then copy the file and replace the existing file in the “target_bin” folder of stock ROM which you downloaded in the Download ROM section above.
Install Driver: (Must do it before proceeding)
Install driver using either Method A or Method B.. Whatever u like. These driver are tested on Windows 7.. So if its fail in Windows 8 then I am sorry.
Part-I
- Unrar the All MTK USB Driver 2014.rar and you will find three folders inside there. Now connect your p780 to PC/ laptop .Then right click on my computer icon on your PC and click on Manage icon on the popup menu.
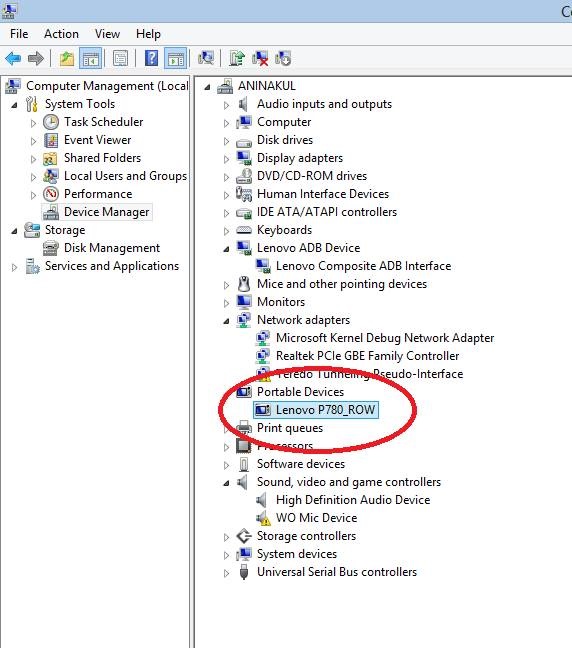
- Now a computer Management window opens.. On the left side you will see Device manager.. Left click on it( On Device manager).
- On the right side of the Computer Management window look for Portable Devices .left click on the small black triangle (the black triangle turns blue when you put the curser on it).
- Right click on the p780 icon .. A popup window appears….left click on “Update Driver Software”…a mini window opens now..with 2 options…. Then left click on ” Browse my computer for driver software”…now PC opens a mini window. Click on the button with “Browse”.
- Now a PC opens a small window.. select the folder ” All MTK USB driver 2014 ” you have already downloaded.
- Click OK after selecting folder which contained MTK Drivers.. Then click on next on ‘update driver software ‘ popup window.. Then PC will install the needed software .click finish when completed.
Part-II (Installing Preloader 65XX driver, Must for flashing)
- Switch off your phone
- Open device manager
- Now connect it to your PC via USB cable and you will see something appear in Device manager and then vanish
- If you miss it plug off the USB cable and then connect, but you must need to find the device appear and vanish
- Once you see the device just right click on it asap and choose “Update Driver”
- Now browse the directory of All MTK USB Driver 2014 folder not the zip file.
- Then click OK and next to install the driver.
Check Whether Driver Properly installed on your PC or not
After installing driver.. Connect your power on Lenovo P780 to PC /Laptop…Enable USB computer connection on the phone as Media Device (MTP)…then…Right click on My computer Icon on the desktop of your PC/laptop…then double click on manage option on the pop up menu…you will be on computer management window… then double click on device manager..(can be seen in the left column)..in the right column find option …portable device…put cursor on the small blue triangle..put a left click on it..it expands…if you can see your Lenovo P780 there means Driver successfully installed…..see the screen shot bellow
Make backup your device (Play safe Game)
Now .. Let me make it clear that flashing the stock ROM will delete everything on your phone memory ( SD card data will remain).. Hence back up all data which is kept in the inbuilt memory especially your contacts.
Note: If you are installing chines’s ROM on ROW device or ROW ROM on China’s device, then must backup IMIE using MobileUncle Tool. Here we are trying to install ROW ROM on ROW device, so we don’t need to backup IMIE. Mobile Uncle tools works only on rooted device.
Warning: 8 GB users should not use ROM that is meant for 4 GB users. And vice versa.. MOST IMPORTANT .
Flashing steps (Let’s Play)
After downloading the correct ROM for your device. Unzip it. Then open the unzipped folder and again unzip ” target_bin”..zip file. Also unzip ” modemdb“..”apdb“. Mean Unzip all those Zip file.
Then we are going to start flashing official lenovo stock ROM jelly bean…this process will NOT void your warranty. .even if you are rooted now. your warranty will be regained if your device is less than 1 year old..( 6 month in the case of battery)
Step 1: Disable antivirus program in your PC
Step 2: open “control panel”, then open “system security”, then open ” “windows firewall” . Then left click on ” Turn Windows Firewall on or off..then bring the mouse pointer inside the small ring at the left side of the “Turn off Windows Firewall( not recommended)”.. Left click in the small black ring…then click OK. Now your PC is ready to flash stock ROM. Without any problems.
Step 3: Now..disconnect your device from PC ..if it is still connected…make sure your p780 has at least above 80 % battery charge …and SWITCH OFF THE PHONE.
Step 4: Now..open the folder ” Flash Tool”..right click on Flash_tool application (a blue square with red left curved arrow)… A popup window appears….left click on ” Run as administrator”.. User account control will ask to execute program. Click on yes…Smart Phone Flash Tool opens now.
Step 5: Left click on ” scatter-loading ” small window opens…select. ” MT6589_Android_scatter_emmc”( You will find this file in “target_bin” folder in the ROM zip file ).Then press the button ..open..sp tool load all files to be flashed….make sure every box is checked( a √ mark in every box)…then. Left click on the box near . “DA DL All With Check Sum”…after that ..left click on ” Firmware=> Upgrade ” button… ( DON’T press download or format)..,you can see some color strips passes. through bottom white strip and within seconds it stops . .now only a white strip with …0%..can be seen…below that white strip …a word ‘ searching’…is seen….. Means SP Tool searching for the PHONE.
Step 6: Now connect the switched OFF phone to PC through data cable.. Flashing starts..( different color strips passes through the white strip …relax and see the show…DON’T touch anything now ..just see the show…when flashing is completed a square with a green ring appears. Means flashing SUCCESSFULLY completed.( flashing take approximately 4 minutes)..Disconnect Phone from PC. Power on the phone. Initial booting took some time ( around 5 minutes)..after booting up you can configure your phone ( date,time,WiFi,Google a/c . etc.)
What to do if flashing does not start?
1. After connecting your Phone if the flashing does not start, then just remove the back cover of the phone on that condition (Mean connected with USB with laptop and in SP flash tool the searching process) and press and hold the red button( You will find the red button in external card slot) using ball pen for 5- 10 second until the flashing process does not start.
2. If still not start, then you have a driver problem. Repeat the Driver install mainly the Part -II. As while flashing you must need the preloader 65XX driver installed.
Final Finish:
For 8 GB users …you are now on jellybean s 119…update to jelly bean s123 through OTA( over the air)…to do this…go to . settings/about phone/system update…then download lenovo ota update…after installing it you are on jelly bean s 123 ( it is around 65 MB)… Then repeat the ota process again ( this time it is around 11 MB )….then you are on official stock jelly bean 124…the most stable stock ROM for best battery life..
Hope you have successfully flashed ROM and downgrade to JB. In case if you are facing any problem. Just comment here.
NB: This article is written by Anil PK and edited by me. Anil Pk has great knowledge on flashing ROM specially Lenovo P780. That’s why I requested him to write such an article for you guys. Thanks Anil for your contribution.


Dear sir,
Firstly i would like to thank for the article about how to downgrade p780 from kitkat to jelly bean.
I could not find the location MT6589_Android_scatter_emmc in Step 5.
Please help me sir. It will be a great help to me. Thank you.
Hey, have you unzipped the ROM file and all those ZIP file inside there. Then you will get a folder name “target_bin” . You will find “MT6589_Android_scatter_emmc” inside there.
Dear sir,
suddenly my phone fall at 63% and cable disconnect from my phone.what should i do.?help please.i cant turn on my phone.
Disconnect phone…and start the process all over again..
If the flashing not started..after reconnecting in the next process…open back cover..and just push and hold the small red button for a while…( red button can be seen below SD card on back side when back cover is removed.).
Use a ball point pen to press red button..
If any problem experience then please feel free to report.
Dear Sir,
When I am trying to load the scatter file, the following two errors are being displayed.
1. Incorrect scatter file format. (Then I downloaded the updated version of SP Flash tools and tried to upload the scatter file, then the following error is displayed)
2. Please check that the name of the scatter file is legal
Please help urgently.
Have you downloaded the proper ROM? Mean if your device is 4GB version then download the 4GB version of ROM. And another thing, what is the manufacturing date of his phone? Look at the card box of phone to find out the manufacturing date)
Hello,
Is it required to remove the battery in-order to flash ? Even though i switched off my phone, still it is entering in to charging mode instead of flashing the software.
Thank you !!
Facing the same problem from last two days
2 possibilities… 1) drivers not properly installed on your computer… 2)SP tool could not start flashing…try this method.. After sp tool loaded all files and you pressed firmware upgrade option and sp tool shows searching.. You connect to switched OFF phone to PC…if flashing not started. Open back cover of the phone and press and hold the small red button which you can see just below the SD card slot for a while.
Do it without disconnecting the phone from PC.
Even that If flashing not started means driver not installed properly.
I will suggest download this https://drive.google.com/file/d/0B-lXFOiToR3rSF9KcmhYYlM5bGM/edit
Then connect the switched ON phone to PC. The above program will install drivers from your system phone…
have the same problem and tried all the steps above but still not flashing, any idea?
Driver installed properly ?
Hi tanmoy,
While doing the flashing process, as per u say in the 6th point connect the switched off phone. I tried connecting the switched off phone to my PC but the phone doesn’t get connected and flashing doesn’t start.. Plzz help..
Hey read your above comment.
Hi,
After updating the USB driver, do I need to activate USB debugging mode before downgrading?
U always need to activate USB debugging while connecting your Phone to PC
Hi !!
i AM STUCK at downloading required files itself.
The 8gb version is not even downloading.
You have some other link ?
Via torrent or something ?
Hey the link is from Google Drive. And its working fine. Please use a Download manager like IDM to download the file with a good internet speed.
Nice…
Thanks for quick reply.
Successfully downloaded via IDM.
Will do the main job later today and will reply back here about the same…
Hi,.
when trying to update driver software in no. 6, no install process then shown up message :
” The best driver software for your software already installed”
“Windows has determined the driver software for your device is up to date”.
What should be done, will it be proceeded ?
Thanks.
Means the driver is installed. Hey I have added another method to update driver. You check the new METHOD B which is quite easy.
after downloading the MTK Update file, I cant unzip the file. it is not downloading properly even after disabling the antivirus. do you have any other website where i can download the MTK Driver update ? please reply as soon as possible… thenk you… 🙂
After getting lot of message regarding driver installation I have added another method to install driver. Just try the METHOD B. 😛
Where Have you added the method B ? I didnt get it anywhere ? Can u please tell where can i get the method B ? Thanks for the reply. 🙂
hi,
i have windows 7 ultimate 32 bit. i tried to install drivers from both the methods but it is not installing properly. what should i do ? everything else is properly downloaded only drivers are a problem. please help. 🙂
Hey uninstall the lenovo Driver that u have install and restart your phone and fresh install using method B. To uninstall connect you device via usb and go to device manager and check portable device. Just right click on it and select uninstall.
Hi Tanmoy,
I already running Method B for installing the USB driver, verify the installation during the HH turn ON. After turn OFF, and ready to do the flashing, the HH only shows the charging progress instead of flashing.
I also had follow the suggestion to press the red button below MicroSD but still the same result as charging progress instead of flashing.
Is there any way to make sure what was happened during the failure to flash the HH?
For your information, my HH version are:
– Android version: 4.4.2
– Baseband version: P780.V23.2013/12/06 12:26
– Build number: P780_ROW_8G_S226_140919
Thank you.
Mack
Dear Friend,
Can you pls also give method to downgrade gionee pioneer P4 from Kitkat to Jelly bean?
I am also facing the problems after upgrading.
Works on me using Windows 8. Thank you so much for sharing!
Welcome!
I cannot flash my phone using flash tools. When connecting my SWITCHED OFF phone on my computer for the step 6, nothing happen. No progress on the Flash Tool application, and my phone just keep charging. What happen, Mr. Tanmoy Das?
Dear Mr. Tanmoy Das,
In step 6, when my SWITCHED OFF phone was connected to my computer, there was nothing happened to the progress bar on SP Flash Tool. And my phone was charging as usual. No flashing progress occurred.
Thank you for your time.
2 possibilities… 1) drivers not properly installed on your computer… 2)SP tool could not start flashing…try this method.. After sp tool loaded all files and you pressed firmware upgrade option and sp tool shows searching.. You connect to switched OFF phone to PC…if flashing not started. Open back cover of the phone and press and hold the small red button which you can see just below the SD card slot for a while. Do it without disconnecting the phone from PC. Even that If flashing not started means driver not installed properly. I will suggest download this https://drive.google.com/file/d/0B-lXFOiToR3rSF9KcmhYYlM5bGM/edit
Then connect the switched ON phone to PC. The above program will install drivers from your system phone…
Dear sir,
For me i couldn’t able to flash my mobile. I successfully completed 5 steps. But i couldn’t able to perform step 6.
Even pressing red button at back and installing proper usb driver, i couldn’t able to flash my mobile.
Please help my sir.
Dear Mr. Tanmoy Das,
I have tried the additional step you suggested to me, I downloaded LenovoUsbDriver_1.0.1 and I successfully installed on my computer, but there is no progress at all. And I have tried to push the small red button in the back of my phone, but it still only showed a charging progress. Is there any other way in order to continue the flashing progress using SP Flashing Tool in step 6?
Hey I have updated the post regarding many problem you people faces. Please read it once again.
Dear Mr. Tanmoy Das,
I have replace the old PRELOADER with the new one, but there is a problem. There is a nootification after I click on the firmware upgrade button, the notification is as follows:
“Image PRELOADER checksum failed! Checksum reference value (0xccd2) in the config ini file.
Please re-fill correct checksum values in Checksum.INI under tool folder and re-load scatter file again!”
What am I supposed to do?
Dear Mr. Tanmoy Das,
I have replaced the old PRELOADER with the new one, but there is a problem. There is a nootification after I click on the firmware upgrade button, the notification is as follows:
“Image PRELOADER checksum failed! Checksum reference value (0xccd2) in the config ini file.
Please re-fill correct checksum values in Checksum.INI under tool folder and re-load scatter file again!”
What am I supposed to do?
Or maybe there is something wrong with the way I replace the old preloader with the new one. Can you explain how we should copy and paste it?
SP Tool dosent flash, its just searches.. USB driver is also properly installed. The phone screen just shows battery charging. The hard reset button also didnt help while flashing.
Appreciate ur most comprehensive step by step process, hats off to u.. Many thanks for helping all of us get out of this kit kat trap..
Have you checked that driver installed properly ?
tanmoy sir,
i dont have any of the facilities for downgrading the phone i have only one question that can the service centre downgrade it!!!!!please help sir !!!!!! i want to downgrade it !!!!!
Yes ! If you request the service center then they will do it.
Dear Mr. Tanmoy Das,
I have replaced the old PRELOADER with the new one, but there is a problem. There is a nootification after I click on the firmware upgrade button, the notification is as follows:
“Image PRELOADER checksum failed! Checksum reference value (0xccd2) in the config ini file.
Please re-fill correct checksum values in Checksum.INI under tool folder and re-load scatter file again!”
What am I supposed to do?
Please, respond to this if you have the solution… Consider it as a progress for your solution making…
Remove.. checksum.INI ….file from target_bin folder
Then flash the ROM…..
It is needed only for device manufactured after April 2014
It worked perfectly for me…Thank you very much Mr.Tanmoy. I got my battery power back……:)
Its nice to see that you got success. Enjoy JB. 😛
hey.. Tanmoy …I downloaded all the suitable drivers for p780 and performed the steps which you have mentioned above. Still The flashing does not occur 🙁 .. As u said I held the red button for more than 5 sec .and observed no change in the process. The switched Off phone still keeps charging when connected to pc . The flashing still remains in 0%. Kindly find a solution and reply ASAP.
Hey have you checked that driver installed properly?
yes..i installed the drivers properly. But when the phone is switched off and connected to the computer, it is not been recognized and the flashing process never starts. Like u have said ,after installing the drivers I clicked computer- manage-device manager-portable….and under portable I could see Lenovo p780..which means the driver has been installed. If there is any other way to check please let me know…I really this to be done.. kindly reply ASAP. thank you
If its showing in Device manager like my process then your driver is installed still I will to remove the driver or uninstall it Just by right click on Lenovo P780 then select uninstall. Then restart and install the driver again. And have you checked your phone manufacture date? Is it after April 2014?
here what u have to do is that as mentioned above in process A
after downloading the firm ware do what ever that is mentioned in process A
but the phone has to be switched off for that,and when connected in switched off mode the phone will be recognized first and then the phone goes into charging mode after some time.in between that time u have to do all the process….
all the best
Dear Tanmoy Das,
I had installed the USB driver properly. What are the indicators which tell us that the driver is installed properly other than the continuing progress of SP Flashing Tool?
As I said in the article check if the driver installed properly from device manager.
Good reference, thanks for your guide. It helped me to downgrade to Jelly Bean.. By the way, I used my Windows VISTA, same steps and drivers are working.
These driver are for Windows 7. I will highly recommend you to use Windows 7.
Heyy…manufactured date is Jan 2014. So I dint download the new preloader. When I bought the phone, it was running in jellybean. But later I upgraded to KitKat once the update was available through OTA. please find a solution and reply as soon as possible. THANK YOU!
If you are unable to downgrade to JB then visit your nearest service center as phone might have some problem.
Dear Mr. Tanmoy Das,
I am sorry for not paying attention to your explanation regarding the driver installation. I have flashed my P780. Thank you very much. ^_^
Welcome man !! Its pretty nice that it works for you.
Dear Mr. Tanmoyji,
I have succeed to downgrade to jellybean but I am facing some network problem.
My first Sim is get disconnect and second Sim does not connect at all plz help me on this .
Thanks very much for the help you have provided
Hey first go to settings >> About Phone >> Version Information, now check baseband version. If your baseband version is v23 then you need to visit service center as its a hardware problem.
If your baseband version is not v23 then you need to flash modem v23. For this do bellow
1. Root device http://sh039.global.temp.domains/~cyberkey/root-lenovo-p780-jelly-bean-kitkat/
2. Install TWRP custom recovery http://sh039.global.temp.domains/~cyberkey/install-twrp-custom-recovery-lenovo-p780/
3. Download modem v23 here https://www.4shared.com/zip/HMmIz27yba/modem_P780_V23.html
4. Flash the modem_P780_V23.zip file through TWRP recovery
Let me know whatever the result.
Dear Tanmoyji,
My phone have baseband version is v23 but i did the proses you have mentioned but still no luck my first sim card still loosing its network and second sim is just dead
but thanks a lot for your help i will send the phone to sevice center thanks again
Yup you should visit service center but before install stock ROM. As rooting mean warranty not valid.
Dear Tanmoyji,
as we have discussed I have shown my phone to service center he took some from me and said that I will change your MB as he did to now my phone is working really grate my network problem is resolved but the base band version is v20 have you got any information about it and the second thing how to get backup of the current jelly bean rom thanks a lot again
You don’t need to backup current stock ROM JB as you can download stock ROM from internet. If you still want to backup then you need to root your device and install TWRP recovery. On the TWRP recovery you can make backup of current ROM.
Hello,
I have done full procedure exactly as per your instructions but stuck at the ending part.
When i finally connect switched off phone, it doesnt flash
it is simply charging, tried red reset button but still doesnt make any difference.
Please guide me.
I have also checked in device manager, and software is installed properly.
is there any other way of checking if software is installed properly or not ?
Should i try the flashing without switching off the mobile ?
and debugging mode is also enabled.
Have you Check Your Lenovo P780 ROW manufacture date ?
Hello
I purchased way before April 2014 so that thing doesn’t apply for me.
Is there any other way to check whether software has been installed properly or not ?
Please guide urgently
i tried everything you said ….still stuck after step 5 flash tool is just searching….drivers i installed twice….still it goes to charging mode please help
Have you checked the driver properly installed or not and also check Your Lenovo P780 ROW manufacture date??
Hi..
I think your driver it’s not installed correctly.so, try to power off your HH first, open device manager will be better to monitoring what happen it,connect your USB cable (With HH power Off) and let PC will try to install new driver , yellow triangle will shown if your driver not yet installed. and then update driver (MTK driver) using browse subfolder and go to All MTK driver (driver tools above by admin) folder ,if successfully your PC will detect MTK driver with com port (ex. com port 17 or any).
hope this help your problem..
Is this ROM original?
I mean, if i flash my 8 gb P780, would it behave exactly like it did out of the box?
Does it have all the apps that came preloaded?
If i ask the guys at service centre to downgrade it for me, would the results be same? Is this the same process he will use?
Yup this is origianl Stock ROM!! And it will be same as out of the box. Even your warranty will not be tampered and its genuine way.
Yes, you can ask service center for downgrade, but I don’t know their procedure!! Now it’s up to you whether visit service center or do it at home.
Brom error: S_ft_readback_fail (4009) ……..but i tried to reflash my phone for s226 and its working but i only need of jelly bean
it happen with me to.. w
Hi Tanmoy! I tried to downgrade using the above method. The only difference is that I am already rooted.
I’m not able to start the flashing process. SP Flash tools simply says “Searching” and my switched off phone just gets into charging mode.
I installed the drivers, checked the device manager (installed correctly), uninstalled, restarted, reinstalled, checked, same issue.. Reset the phone using red button the back, same issue.. Did a Factory reset, same issue.. Unrooted, same issue.. Did a hard reset from Factory Mode as per your guide, same issue. Phone is manufactured in June 2014, so used the new preloader. Then I tried the default preloader that came with the ROM, still same issue.. Anything else I can try?
Took my device to a service center. They downgraded to JB in less than 10min! They only asked me why I’m downgrading. I’m a happy P780 owner now..!
had a hard time installing driver. i installed it manually specially the mtk part.
now im on stock JB.
thanks Tanmoy Das
Dear sir,
The flash wont start after i connect my switched off phone at the 6th step.
Hello sir,
I hav lenovo p780. I would likt to upgrade it to kitkat. Could u pls suggest me to do?
Dear Tanmoy,
Will camera and flashlight work with this downgrade? It’s a known issue that for new phones camera and the flashlight works only with Kitkat and not working on Jellybean.
I can’t assure you and I don’t know this kind of problem as JB s124 is most stable. If something goes wrong, then you can upgrade to KitKat again. Do wisely. 😛
Hi Tanmoy,
Tq for your valuable replies. But I tried all the above points. Still my mobile is not flashing. I tried a and b options too.
Please suggest me any other way to flash my lenovo p780. My mobile is not getting signals.
Tq.
Ravi
What is your actual problem? Have you successfully installed the driver?
Hi Tanmoy,
Thank you for sharing this valuable information,
I have successfully flashed the My lenovo P780 wtih 8 Gb. it working , but facing a problem,
its showing only 4.38 GB total Built-in space as my phone is of 8 Gb. and also not detecting My SD card as external storage. pls advice….
Manufacturing Date :- March 2014
Sachin.
Do a factory reset!
is there anyone who has successfully downgraded to jelly bean without any problems using the above method?? i m already on jelly bean 4.2.1 but i want to upgrade to kitkat just to experience it then get back to jelly bean thats y i wanted to confirm is there any successful way to roll back the upgrade or not..
I m facing the same issue at Step 6. as mentioned above by many..
I had a TWRP installed rooted 8GB P780 Lenovo phone which had a manufactured date before April 14,
Tried all method , also tried factory rest using both methods ( using phone setting n using hardware method) but still not able to flash my rom. Kindly suggest
Thxs
Dev
Thank You Very much…
My mistake i have updated to Kitkat.. now with the help of article i downgraded to Jelly bean… Its working super fast as previous….. Thank You ….. Thank You a Lot
Thanks that it worked for you! Kindly guide other users who have been facing problem! Hope you will help other users.
is it working windows 8.1 OS?
Sorry, but personally I have not tried on Windows 8.1! But I think it will work!
Dear Tanmoy,
Same driver problem here. The device is detected when turned on but not when off. IT goes to charging mode and the flash tool keeps searching. It shows as MT65xx preloader when connected to a different USB port. Could you please advise?
Regards,
Bala
Sir, you are truly a life saver.
I followed many tutorials before with no luck. Followed yours and I got the JellyBeans back on my P780 in no time.
Thank you!
sir mobile networks of my p780 after flashing are still not coming can help ?
do u know of any stable rom with best performance and batery life?
I was amazed by P780 superb battery performance which when I bought it can last more than 2 days with all online application ON! When KitKat arrived , I thought it would be nice using the most updated android version on my P780 and hoping my phone will be more advanced in function. But my hope was broken and I was disappointed. The UI was nice, and operation got simpler, but it took battery life drowned significantly! From 2 days battery life on Jelly Bean to only 20 hours on KitKat!
That was so wrong, and I was so disappointed so I sold my first P780. Using several type of Lenovo smartphone and other brands, did not get me satisfied as P780 gave me. Now I have my 2nd P780 on KitKat, but not for long. I have to downgrade this version. Then I found this site of yours, which is so helpful with step by step clear explanation. Now I got my P780 with my desired bad ass system in its guts!
Thanks a lot!
This is Exact what I wanted from a tutorial.
just 5 min and i have successfully downgraded my rooted lenovo.
Thanks for your help
i followed your steps.but the device is not connecting properly and the flash tool is never identifying the device.in the device manager its showing a exclamation mark saying that the device is not connected properly.i tried every thing but its not working.i also tried to uninstall the device in the device manager and again installing it.so, please help me with this issue…
will be waiting for u r reply……….
Have you installed the driver properly? Are you using Windows 7?
thanks Tanmoy Das keep it up
i had perfecly downgraded my lenovo p780. thankss
By Utkarsh sharma
Tanmoy das where do you live because i have to downgrade my phone from kitkat to jally Bean so plz send you address to my email [email protected] please help me
What’s wrong? Read the proper guide! All the septs written here!
bricket buddy…..everything done and went the way you explained……and wow…..bricked
May I know on which step your phone got bricked?
This should not be happed! The only way to get back your phone is do this process again!! If the SP flash tool does not start, then do whatever mentioned here.
evrything done and happened as illustrated…..the round grren circle appeared too…..and then…..the phone NEVER booted
but dont worry dear….i was just informing and in no sense blaming…..i fairly understand that flashing is always on own risk
Hey thanks buddy, I have sucessfully downgrade my phone to jelly bean. Thanks for your support.
Dear Sir, after finishing everything I tried to download s 124 version, and then things start to went wrong. My bluetooth kept stopping and therefore I can’t press anything except OK-ing my repeating bluetooth error notification. Do you have any suggestion about this? Thank you.
Make a factory reset!
thanks bro, i believe even with my noobility i can degrade my OS thanks to your blog. thanks once again
can u suggest what version is required for sp flash tool? or we can use latest version?
It’s a good habit to use the latest version!
Hearty thanks to Mr. Anil and yourself Sir! Successfully done!
Thank You sooooo much Sir…
My phone has downgraded with your simple steps without any problem..
Its really thank full by helping to fix this… Why I downgraded to jelly bean is that only one reason..
The camera clarity is so bad… when I capture an image, it looks blurred…if you don’t mind can you please help when lenovo face this type of issues..?? please mail me…:)
Heve you taken photos in 8MP? Otherwise, do a factory reset.
I just like to thank you for this article. it helped me downgrade my phone. More power!.
hi ‘m using p780 , 8GB mobile recently i replaced my touch and display after that its working fine for next two – three days and once it suddenly got switched off now ‘m unable switching on the phone
if i connect to charging red light is coming and if i connect to system nothing is showing except red light in phone can any one help me out with same ASAP with the steps
Switch off your phone and open the back cover and press the red button near the sd card slot using a pen for one or two times. Then try to switch it on! Let me know.
Dear Brother
Everything I have done exactly what you had mentioned it downgraded to Jellybean But the Problem is the Ram is Exceeding above 90% and phone is Hanging Please I need help kindly suggest
Thank you a lot, I have follow your instruction and success downgrade mu P780 to Jelly Bean
Thanks Tanmoy and Anil,
I had gone as per the instructions and successfully downgraded from Kitkat to Jelly Bean. Now the battery backup is superb as it was previous. Thanks to both of you
I m very unhappy with my mobile. It has become very slow. And gets hanged a lot. And even my battery performance is not that good as it used to be jelly bean. I want Jelly Bean back in my mobile, but I am really scared, if this will work or not. What should I do ?
i tried the process advised by you…. while flashing receiving an error “BROM Error S_ST_DA_NO_RESPONSE(4001) DA did not send response data to flash tool”.
Kindly advice
Hi Tanmoy – thanks for sharing. The downgrade to Jelly bean worked like charm. However, my wifi and bluetooth have stopped working. Bluetooth and wifi wont just connect – any thoughts on how I could troubleshoot further?
You can do a factory reset!
Hi Bro,
Do I need to load also the files in folder “apdb” & “modemdb” ?
Hi, i would like to know, will service center does degrading process ? and is there any other simple way than going through all this hassle. my phone has serious issues like one of my simcards doesnt recognize and battery drains really fast even without using any apps. so should i downgrade it?
Yes! You must downgrade!! Have you previously installed any CUSTOM ROM?
What should be in download agent folder
Which download agent folder you are talking about?
Thank you BRO !!! I followed your simple steps and got my phone back to JellyBean. Thank you a lot.
Very happy to know people enjoyed the article and making their Lenny p780 the most enjoyable device according to one’s own taste…
You saved my life bro……..
Thanks a lot …Awesome guide …
Now I have downgraded my p780 to jelly bean…so can I upgrade it again to kitkat?
Works like magic! Thank you very much 🙂
Thank you sir for your prestigious article .I will successfully downgrade kit kat to jelly bean …it make my phone (lenovo p780 8G) to a new phone with fast speed..as new phone…during downgrade process I face driver problem… But it will be resolved.. At last …thanks
thank you so much for helping me to downgrade my phone by following such a complete steps. 😉
Now, Im currently on my JB again.
Downgrade process is succeeded.
Happy to help you!
Sir my phone has ended in a bootloop!!!
What should I do now??
Flash again!
Please HELP me, My Phone if turn OFF switch to charge mode so can’t downgrade if Plug in USB to myphone.
I have successfully done the flashing…but a problem is that in the play store the icons have black background… Is it a OS issue or bug? Pls answer…
This thing was my Phone also. I think its an OS glitch or Play Store. Don’t worry.
sir u have written “Install driver using either Method A or Method B..” where r these method i didn’t find it in this post.. can u please give me detail of how to install drivers..
Thank you Tanmoy Das for a very helpful and detailed guide in downgrading the firmware of Lenovo P780.
@All: For those who were confuse regarding the Method A or B on which Tanmoy was referring to, the Part-I was the Method A and Part-II was the method B. Hope this helps.
Thanks again! 🙂
If you’ve certain have installed the right driver but flahsing still don’t start, use this SP Flash tool instead
Flastool Tools_v5.1352.01:
https://cloud.mail.ru/public/b9f43f63f403/SP_Flash_Tool_v5.1352.01.rar
Its an old one so don’t forget to change the option (firmware upgrade) in a dropdown menu
It works for me, hope it helps
Hlo , my phone lenovo p780 after updated jelli to kitkat it is not working touch . plz help
Do a factory reset!
i did everything as it was said and after appearing green circle that means succesfull flashing i cannot turn on my phone. can you please help me?
Would this method work even for rooted phones?
Thank you,
Its work, I trying using win 7 & 8. no problemo..
preload not taking in tool what to do plz help author….
Preload not taking mean? May I on which step you are facing problem.
Thanks , very nice and detailed tutorial
Thank you for the guide.Kitkat rendered my phone useless as touch was completely not working…now reverted back to jb…thank you again.