
How To Install Stock ROM On Lenovo A7000 ROW Version
Hi Lenovo A7000 users! Have you rooted your Lenovo A7000 ROW version within the warranty period? Then you should know that you can’t claim the warranty, if your Lenovo A7000 ROW is rooted, as its violate the terms and condition. Then how to unroot the Lenovo A7000 ROW version. There are many apps to unroot device, but at the end of the day there exist some trace by which company will know that your Lenovo A7000 ROW version once rooted. So how to claim warranty?
Not only warranty, if your device is soft bricked and not opening or freeze in bootloader as you have tried to install custom ROM on Lenovo A7000 ROW version. How to get back your device?
In this kind of scenario the best way to unroot or bring back your device is to Install Stock ROM On Lenovo A7000 ROW Version.
Yes! Installing the stock ROM or Official ROM can bring your device back to the factory condition. Same as when you first access your Lenovo A7000 ROW version. So how to Install Stock ROM On Lenovo A7000 ROW Version? Here is the guide that you need to follow to install the official ROM in Lenovo A7000 ROW version.
How To Install Stock ROM On Lenovo A7000 ROW Version
NOTE: THIS METHOD IS FOR ROW VERSION OF LENOVO A7000, DON’T TRY ON CHINESE VERSION
A. Download Tools:
Download Driver for Lenovo A7000
Download flash_tool_v5.1436.00.000.rar
Download Stock ROM (Download any of these ROM)
A> A7000-a_S228_160621_ROW.rar (password for the archive: lenovo-forums.ru)
B. File Preparation
Unzip or UnRar all the above file you downloaded.
C. Enable USB Debugging
Go to Settings>> About>> Build number and tap it 7 times to unlock Developer options. Then return to Settings>> Developer options and tick the USB Debugging option.
D. Install Driver
Install the driver then restart your PC, then connect your phone to PC via USB cable and wait till Windows configures it. Make sure the USB Debugging is enabled in this process. Once the configuration has completed, again restart your PC.
E. Install Stock ROM On Lenovo A7000 ROW Version
NOTE: Before doing this process make sure you have backup of contacts, SMS, call log or files in internal memory. As it will format your whole phone.
1. Charge your phone up to 80% and disable all those firewalls or antivirus on your PC
2. Run as Administrator the flash_tool.exe, that you will find by extracting flash_tool_v5.1436.00.000.rar
3. Click on “Scatter-loading” and browse the scatter file MT6752_Android_scatter.txt, you will find this in target_bin folder inside the A7000-a_S136_150519_ROW folder.
4. In the menu “Option” tab, go to “Download”, and put a “tick” in the “DA DL All with Checksum”;

5. Now choose the Firmware Upgrade option like this
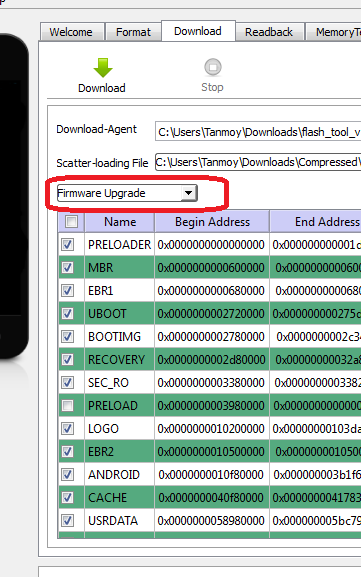
6. Now hit the Green Download button like this pic
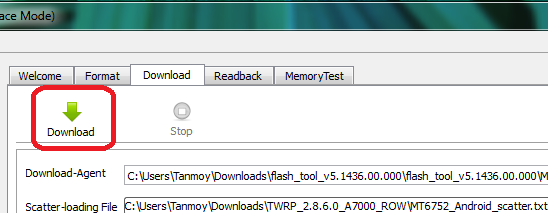
7. Now turn off the phone and remove the battery for at least 5 seconds, then put the battery back.
8. Connect your Phone to PC via USB, this will start the flashing process.
9. Once the process has completed, we will see a huge green check box. Now we can disconnect the phone from the cable.
10. Now switch on your phone, it will take some minutes for first boot.
11. You have successfully installed the stock ROM or Official ROM on Lenovo A7000 ROW version.
If the flashing process does not start just remove the battery then put it back and repeat the process or install the driver properly. Do comment for any doubt or question. 🙂


I have follow your instruction and restore the rom sucessfully but now the keyboard and mobile data network are not working.
Has your device been ROW version? Give a factory reset!
same issue sim card not responding
Is your device ROW version? If yes then do a factory reset!
hello after flash this rom my phone is working but showing invalid imei no. and no network….
Use sn tool and flash imei.
Hey, could you fix it? Same problem here.
thanks for lovely rom.. its work on my lenovo a7000.
can u fix my problem .i have rooted my device lenovo a7000 it works fine.but after factory reset it stuck boot loop animation 5 to 10 hrs and till not workin .so help me .i need serious help…………..
same problem with my phone also
can u help me if u have solved your problem
Do this again! Make sure you properly follow the step 4!!
Can I update to 5.0 after installing this firmware?
Open in recovery mode and clear cache data
I have a problem with my lenovo a7000 when i inserted an sd card it always shows sd card damaged.
Thank you very much, very easy to understand, there is no difficulty, I succeeded in my a7000, applause for you………………………..
Hi, I was wondering is there a way to downgrade the Lenovo A7000 from lollipop to kitkat? Thank you very much.
You need to flash stock ROM of Kitkat version!
i have install custom rom how to recover stock rom ?
Nicely explained Tanmoy. Thanks.
thx….. its worked….
Can I update to 5.0 after flashing this rom or not?
i stuck in boot black screen but now working just fine thanks allot
Yes!!It perfectly went right for me!! a lot of thanks!
Please help me, i follow your instruction everything fine until
i power on my device, the screen become white with stripe, can’t see anything
i try install CMW, success but still white screen 🙁
i believe is not my broken LCD, because before flash everything is fine
Are you using ROW version of Lenovo A7000?
I am also having this problem, tried numerous attempts still facing this problem, i did not download the rom from here as my phone is a7000a. PLS REPLY and help me 🙁
How you install CWM? I think your LCD may have problem!
i have install custom rom how to recover stock rom ?
This is the method to install Stock ROM despite any Custom ROM installed on your Phone
i have custom rom(cyanogenmod 12.1) in my lenovo a7000 but its not stable and have lots of bugs so i want to recover original stock rom without any bugs
You can try this to flash stock ROM!!
absolutely back! attention everybody! please don’t use any of the custom roms.. believe me i have tried all of them and this is the best. Just root it and enjoy !
PS. i have tried MIUI 7, pac rom , cynogenmod 12.1, nexus rom, lewa 6.1
How to back to a original lenovo a7000 lenovo recovery and also update properly without error
Thanks this process really genuine and working 100% and back to original Lenovo recovery
Please help the other who are facing problem!!
is this 5.0 version or what i need to know !
Thumbs Up brother 🙂
well done, thanks from lazycoder.pro
i got message (brom error s checksum error 1041) on sp flash tool when finishing flasing 100%.
device cant reboot just vibrate only.
when i plug charger with battery insert, its come with dl image error on screen.
please advise. what should i do? thx
Start from beginning..
Phone is stuck at lenovo logo with the words Tool dl image fail! It goes blank after this. What should i do now ??
Make sure DA DL All with Checksum is enabled… Now you can in step 6 that the PRELOAD is not checked so select everything and then select Firmware Upgrade and flash it.
You can also manually browse the PRELOAD file just by clicking there and then browse in traget_bin folder. It should be named “preload.img”
This is the original stock recovery
Can you plz provide the stock Marshmallow ROM for A7000?
One more thing ,download link for the rom is not working????????!!!!!!!!!!!!!
Have added the latest version of ROM. S228!! Try it
I think this rom only work with lenovo a7000 indian model. My phone is actually purchased from UAE and it is lenovo a7000-a. I asked about this to a guy who is expert in flashing rom, he said chance of bricking.
My current condition is i accidenty format all data including nvram. So my phone not showing any signal. I used maui meta 3g to rebuild my imei but even after that I did not get any signal. I tried to fix my serial number. After fixing, it located under orginal serial number as ‘pin’. I don’t know what to do now? Can you provide nvram file(any kind of backup .zip,.bin,.img, twrp) I am really tired of searching through the web for 5 week. Thank u in advance!!!!
I have a reaback file ROM_0 Created using sp flash tool from another phone of same model number. But I could not extract it with mtk droid tool Because mtk6752 is a 64 bit latest soc and mtk droid tool fail to create scatter file(create scatter file option is hidden even after detecting phone). So,do you have any suggestions about extracting the rom file other than mtk droid tool???
I tried mtk droid tool to extract a back up from spflash( read back file’ROM_0′ ).It fail to create the backup. It does not support new mtk soc. Is there any method to extract the dump file created by sp flash tool?? Any suggestion??
I want firmware for lenovo tab3-850 M LTE .my email : [email protected].
Just google it.
I did all the steps but when I switch off the phone and connect it it starts charging instead of flashing . And window says MTP v com error . Device failed to start code10 .please help me