
How To Root Lenovo A7000 [100% Working]
After the successor of Lenovo a6000 and a6000 Plus, Lenovo has launched a high end low budget phone Lenovo A7000. Lenovo A7000 comes with 5.5 inch 720p IPS display having MediaTek MT6752m 1.5 GHz true Octa Core processor with 2GB RAM. So if you have the Lenovo A7000 and you want to explore more by rooting then you have come right place to root Lenovo A7000. Before you are going to root your Lenovo A7000 make sure you know all the pros and cons of rooting like it violates warranty, not only your device may soft brick. You should also make a proper backup your date before rooting Lenovo A7000.
So if you want to root your Lenovo A700 then follow the every step carefully.
Backup
Make a backup of every bit of data and apps, contacts of your Phone. You can use many third party software SyncDroid to make a backup just by connecting your Lenovo A7000 to PC
Method 1:Install TWRP Recovery and Root Lenovo A7000 ROW Version
Note: This method is strictly for ROW devices, don’t try on Chinese devices.
A. Download Tools:
Download Driver for Lenovo A7000
Download flash_tool_v5.1436.00.000.rar
Download TWRP_2.8.6.0_A7000_ROW.7z
Download SuperSU-v2. 49. Sep
B. File Preparation
1. Now send the SuperSU-v2.49.zip file from your PC to the internal memory of your Lenovo A7000
2. Now right click on TWRP_2.8.6.0_A7000_ROW.7z file and select Extract to TWRP_2.8.6.0_A7000_ROW\, you will find TWRP_2.8.6.0_A7000_ROW.img inside the folder. Just rename it to recovery.img
3. Unrar the SP flash tool.
C. Enable USB Debugging
Go to Settings>> About>> Build number and tap it 7 times to unlock Developer options. Then return to Settings>> Developer options and tick the USB Debugging option.
D. Install Driver
Install the driver then restart your PC, then connect your phone to PC via USB cable and wait till Windows configures it. Make sure the USB Debugging is enabled in this process. Once the configuration has completed, again restart your PC.
E. Install TWRP Recovery and Root Lenovo A7000 ROW Devices
1. Run as Administrator the flash_tool.exe, that you will find by extracting flash_tool_v5.1436.00.000.rar
2. Click on “Scatter-loading” and browse the scatter file MT6752_Android_scatter.txt that comes in the TWRP_2.8.6.0_A7000_ROW folder.
3. Now it will show like this, make sure only recovery selected and selected the Download only option
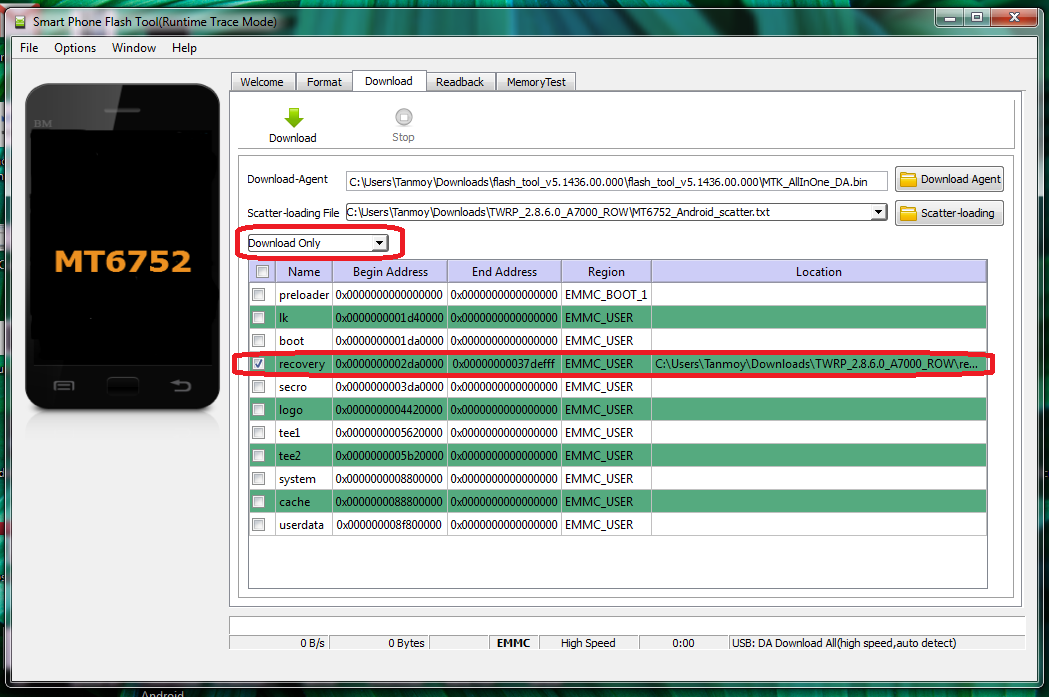
4 .In the menu “Option” tab, go to “Download”, and put a “tick” in the “DA DL All with Checksum”;

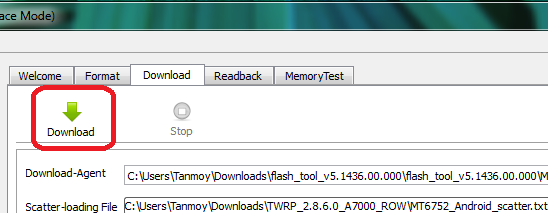
5. Now hit on the Download button
6. Now turn off the phone and be sure to remove the battery for at least 5 seconds
7. Put the battery and connect your Phone to PC via USB, this will start the flashing process.
8. Once the process has completed, we will see a huge green check box. Now we can disconnect the phone from the cable. You have successfully installed TWRP recovery
9. Now don’t switch on your phone. If you switch on then twrp recovery will be replaced by default recovery.
10. So press and hold volume up + down buttons, then power button. In other words, hold three buttons simultaneously. When the Lenovo logo appears, release the power button, the volume of both to continue to hold. ASAP phone enters the TWRP release all the buttons.
11. Now select Install Zip then Select Install Zip from /sdcard and browse the SuperSU-v2.49.zip file that you copy pasted earlier to flash SuperSU-v2.49.zip
12. Reboot your Phone
Now you have root access on your Lenovo A7000 ROW version, To whether you Lenovo A7000 has root access or not, just go to Google play store and install Root Checker and run it.
Last but not the least, if your device is in warranty period and you have rooted your device, then the best way to claim warranty is install the stock ROM on your Lenovo A7000 ROW.
Also Read How To Root Lenovo K3 Note and Install CWM Recovery
METHOD 2: (Not working, try at your own risk)
1 Driver of Lenovo A7000
2 iRoot or ROOT master
Root Lenovo A7000
NOTE: This method is not working now as per users’ comments! So try other method or stay tuned so that I can post new method.
1. Enable Developer mode by tapping the build version 7 times from setting, then go to developer mode and enable USB Debugging.
2. Now install the driver or Lenovo A7000 on your PC. (You can go device manager on your PC to check whether its properly installed or not)
3. Now install vRoot or iRoot on Your PC
4. Run iRoot, it will ask to connect your Phone to PC via USB cable
5. After successful connection, it will show like this
.png)
6. Now click on Root to root your Lenovo A700

7. It will take some time to root your Lenovo A700, till then do not touch the phone or the USB cable. After successful root it will show like this

Now your Lenovo A700 have rooted and it has the root privilege. After successful root you will see two new Apps, you can uninstall it using App remover. Then you can install Super Su from Play store.
Download SuperSu from Google Play Store here
Incoming Search:
How to root Lenovo A7000 by using iRoot
Working method to Root Lenovo A7000 ROW version


iRoot is a wonderful app for rooting, it’s been a long time since I rooted any Android phone. Guess it’s time to try my hands on some old phones and experience it once again. 😀
I root was not worked in my lenovo A7000.
First method did the work.
Anyway hats off to you guys
If ee want to remove the twrp recovery and switch back to stock recovery, while keeping the phone just rooted. Please explain the steps.. Thank you.
is it works?
Not working!
Completely working dude
Its working perfectly .
Thanx 🙂
Worked like charm for me ..! 🙂 Thnks .. mate …
how to install zip of supersu in lenova a7000 it shows lenova recovery in chinese language only four options are there no option for instal zip pls help me my number 9989939238
Hey, I think you missed the no 8 and 9 points! If you switch on your phone after flashing, then the TWRP recovery will be deleted and when you will access recovery you will see Lenovo recovery! So flash it again using SP flash and then directly go to recovery mode by pressing Vol. UP+Down+Power button simultaneously.
Hey man.. This is a great post.. I have successfully flashed the twrp 2.8.60 but when going to the recovery there’s no option for “install zip from sd card” so i was unable to root my device.. Need help please… Thanks in advance.. BTW i hav the latest firmware version installed on the device.. “A7000-a_S144_150721_ROW”
After successfully flashing via SP Flash tool, don’t switch on the phone! Instead of this you need to go recovery directly by pressing Vol UP+Down+ Power button simultaneously. Read the 8 and 9 point carefully.
Hi, will the regular firmware software and app auto OTA upgrade work after rooting the mobile
Hi,
When i click on download and connect my phone, nothing is happening.
i did all things according to above description:
1- installed usb driver, enable usb debugging, unknown source.
2- start flash utility and click on download then plug mobile via usb cable but no response.
Uninstall the driver and install it again!
Hi.
In my lenovo a7000.
The boot lang is chinese should i try your method of root or not.
Please rply.
Hope will give me rply soon.
Thank you.
Hi.
In my lenovo a7000.
The boot lang is chinese should i try your method of root or not.
Please rply.
Is i will face any problem after this
Hope will give me rply soon.
Thank you.
Before rooting google about it! There will be no problem with boot language! Finally, do it at your own risk!
iam root my mobile and i cant open google i want reset the mobile i cant help me please my mobile lenovo a 7000 chinsese
This method was for ROW version! You should read those notes first!
Why root is not working in lenovo a7000 whyyyyyyyyyyy
What happen..
Are did the same what menstion in upside.
Means instruction.
Is there a difference between lenovo-A7000 and lenovo-A7000-A
Hi das.
After going with your root method.
Success result.
AfterAfter some time my Mobile root i missing.
What is the problm.
And
Xmode game latedt version is not supporting 5.0
Lolillpop.
Please help.
It is telling brom error
can please someone help me out.!! its saying that it cannot find scatter file and make sure that file is exit before downloading…!!
Same problem happened please help
Same issue
1ST METHOD WORKING PERFECTLY
dude i was not able to download tools from the link given above,
pls help me out
Hey the links are working perfect. Just click on the link.. you will be redirected to a site Shorte.st just wait there for few seconds untill SKIP THIS AD appear on the right upper corner. Click on it. Make sure you are opening from PC.
i do all the steps and now my lenovo cant boot already.. Please help
If you have tried first method using SP Flash tool then do these steps again make sure you don’t miss the step 4 about enabling DA DL All with Checksum”;
Thanks a lot Guys !!!!
Method 1 works like charm, Thanks a lot once again.
Happy Rooting 🙂 🙂
Will the 1st method of rooting wipe my phone’s data and apps?
Yes! It will delete all data! So make a backup then try!
Isn’t there any working way to root Lenovo a7000 without the data and apps being wiped off?
Hey Tanmoy, I was able to get it working last time. But one question, how long does it generally take from a procedure standpoint. Last time I slept off after initiating and so don’t remember. And today, when I am trying to root, this has been going on for almost 30+ mins now.
Reg,
San
This is process of few minutes! It should not take 30 minutes! May I know on which method you are using and on which step it’s taking such a long time?
Followed to the letter, but now it wont boot up. Stuck at lenovo screen.
Is your device ROW?
i’m currently face the same problem.
it stuck on lenovo screen, even after i took off the battery and restart the phone.
my device is ROW.
i have the same problem.
it stuck on lenovo screen, even after i took off the battery and restart the phone.
my phone is ROW
Have you done all the steps correctly? And have you got green circle notifying that flashing done?
Sir i followed all the steps correctly ( i think ) but after step 7 i receive a error ” PMT changed for the ROM, it must be downloaded ” did I do something wrong? how can i fix this? please help sir
Are you using ROW version of Lenovo A7000?
Try this http://www.nextclock.com/2015/02/how-to-fix-sp-flash-tool-pmt-change-rom.html
sir i tried step one everything was fine but when i open flash tool via admin he saod cant find acatter file make sure u have it
Run as admin the flash tool… Click on “Scatter-loading” and browse the scatter file MT6752_Android_scatter.txt that comes in the TWRP_2.8.6.0_A7000_ROW folder.
Make sure you Unzip the TWRP_2.8.6.0_A7000_ROW.7z to a folder.
ITS WORKING FOR METHODE FIRST
T Y FROM INDONESIA
Sorry version installed on the device.. “A7000-a_S152_150917_ROW” –
Will this method work on a windows 10 laptop ?
I have not tried! But you can try!! Hope it will work!
after rooting my phone i reboot it but a lonovo logo appear on the screen and then nothing happend so plz suggest what i do
there is file not found .
make sure DA path is correct
check rom file exists
scatter file is sync with rom?
broom error coming on window 8.1
How to root lenovo A7000a without computer,..plz help me sir
Till now I don’t any kind of process to root without PC! I will update this in case I find some genuine method to root lenovo A7000 without PC.
how long before step 5 is finished?
I can’t understand what you want to say!! By the way the flashing process takes a few seconds!
i was trying rooting done but lucky patcher not working present my version
“A7000-a_S152_150917_ROW” can’t install mod games like asphalt 8 the package duplicate permission null
tkank ad
i hv lenovo a7000-a aio-row
i try root with above twrp but not get rooted
it show some error .qch file cannot open
i try many flash tool from different sites also but same error ocuure
i m using hp lapptop ac024tx win 7 sp1 64 bit
pls hlp
Is your phone working fine now? May I know in which step you are getting the problem?
Nice Tutorial to root mobile very easily
thankz…its work for me….
Hello, I tried to follow this tutorial but I ended up on step 7 (method 1): Put the battery and connect your Phone to PC via USB, this will start the flashing process. No flashing process started. 🙁 Can you help, please? It looked like there is some mistake in prvisous srtep 6 – I have set everything as described in tutorial, hit Download button but it seemed nothing happens. So after some time I disconnected the phone and followed the tutorial to next step, but it seems that nothing happens.
If flashing does not start mean driver not installed properly mainly the preloader driver.
coba mampir kemari mas, uda ane tested 🙂 work
I think I have made some mistake and now my lenovo A7000 is dead. When I am switching it on, its just vibrating for a sec. thats it! please help me to recover it :’-(
If you are using Indian ROW version then flash Stock ROM if Phone is dead http://sh039.global.temp.domains/~cyberkey/how-to-install-stock-rom-on-lenovo-a7000-row-version/
when i am trying to enter in recovery mobile is going in fast boot mode
why this …….
help me out please
yea i have same problem i want reset my mobile to orginal i cant back it heeeeeeelp guys
Flash Stock ROM! Here is tutorial for ROW version of Lenovo A7000
http://sh039.global.temp.domains/~cyberkey/how-to-install-stock-rom-on-lenovo-a7000-row-version/
After the latest OTA (S153), both the methods are not working.
Heeelp man please i want back reset my mobile again
Hey plz help,
after point # “11. Now select Install Zip then Select Install Zip from /sdcard and browse the SuperSU-v2.49.zip file that you copy pasted earlier to flash SuperSU-v2.49.zip ”
my lenove A7000-a screen has been stuck on the lenovo logo screen,
can you help me in it please
it was showing pmt error…… pls tell the solution for this
Are you on stock ROM? and are you using the ROW version of Lenovo A7000? Then read this, you will know what to do. This method is for HONOR so read carefully. http://forum.xda-developers.com/showpost.php?p=53010118&postcount=647
i downloaded the TWRP 2. 8. 6. 0 A7000 ROW and extracted but i cant see anything they saying operation faild
plzz hlp mee
send the real link plzzz
Disable antivirus then download TWRP_2.8.6.0_A7000_ROW.7z file and extract using WinRAR. The download link is fine.
How will I get to know that my device is a chinese device or a row device? Please reply fast…thank you
You can check it from About Phone option!
When I follow all steps and finally hit the download button of flash tool …it tells that the file is not setup yet
hey bro, i m getting BROM error. Many others also posted for this error but u dont answer them.
Plzz help …..
Is is error code Error 5054 ?
Meaning: The files you’re trying to flash do not belong to or are not compatible with the phone you’re trying to flash them to
Solution:
* Ensure you’re using the correct files. If you’re sure they are, then try formatting before flashing again
It perfectly worked for me 🙂 ..I’ve done it.
Note: This method is strictly for ROW devices, don’t try on Chinese devices.
What this line mean – shall i not try this method on a7000 phones which is made in china.
Every Lenovo phone is China made. But Lenovo makes two variant of a same model. Does your phone comes with Google Play store out of the box then its ROW version. In build version you can check also its ROW or CN.
tried Kingroot on my Lenovo A7000-a and it worked
is it working now because most of the users are now having problems…..
stuck at lock screen and you are only giving rom download link
Its working… .
Thkz… bro
i ended up brickigng my a7000, what do you mean by ROW and CHINESE devices? how can i determine if its a ROW or CHINESE, i know its Original
after flashing the TWRP successfully my phone dont POWER ON now, only LOGO appears with notes below saying “TOOL Image DLL failed.”
what can i do to unbricked my phone?
You need to flash stock ROM!
To know if your device is ROW or CN: First make sure your device is on stock ROM, then go to settings and About then build number.
thanks for the reply, i solved my problem by flashing the recovery again but changing the setting, .In the menu “Option” tab, go to “Download”, and put a “tick” in the “DA DL All with Checksum”.
I read instruction again and i saw where is my mistake.
thanks!
Hi Tanmoy Das,
Thanks for this awesome explanation. Could you please help me to understand if it would be possible to install the apps of external memory after rooting Lenovo a7000 currentlly it doesnt allow.
Thanks
There are some apps which allow it to do this, you can Google those app.
Thanks it worked flawlessly.
hey hello,
It worked for me very well at the second try.. as i missed one step in first instance which ended me to flash my mobile. Thank you so much for your awesome idea.. I have a question now, i’m getting system update marshmallow 6.0 how can i update it without unrooting or affecting the rooting.
Please suggest me any app or manual technique for lenovo A7000.
thanks bro, works perfect method 1
Hi
I tried method 1 and completed step 8. Then i pressed volume up+down buttons and power button simultaneously, the lenovo logo appeared then i released power button and continued to hold volume up+ down buttons,NOTHING HAPPENED (It should have entered the TWRP).
What should i do now???
Please reply fast.
I have android 6.0
Have you switch on your phone after flashing TWRP?
I followed the instructions number 1, now the phone will not turn on. Just glows red and sometimes vibrates.
Have you tried on your ROW device?.. If its not turning on then flash stock ROM
Can I go with same method for lenovo a7000-a model..plz tell me
I am not sure!! Try a your own risk.
hi sure , first thnx for ur great jope , it is worked perfect , but now i just want to do fectory reset , is that will do any damage for the new rom , and i see new updates for this rom , so can u give us the new update wich worak in A7000
Rooting may cause you no OTA updates… first, be sure is there any update available for your device by Google, Facebook Group or asking your friend who has same device. Just check the build number you will understand whether your friend has updated or yours. If there is OTA update but you are not getting then you need to flash stock ROM as Rooting stops OTA update sometime.
and wht about fectory reset , is that will do any damage for the device after root?
how much time did the flashing process takes?
upload files again pls i want to root my phone again by this method
Th the link says file owners restricted the file