
How To Root OnePlus X and Install TWRP Recovery
Recently OnePlus has launched a budget great looking phone with awesome specification name OnePlus X. Without elongating the intro I am going to share you how to root OnePlus X and install TWRP Recovery. But here I want to mention that rooting your device violates the warranty terms and condition. Not only this you will get OTA update. To get the OTA update, you must have stock ROM, so before rooting we will make a backup of stock ROM such that we can install the stock ROM anytime to get OTA update. Seems too much technical for you. Don’t worry follow the every step I will mention this article, you will be safe. Don’t be a scientist just follow the guide.
Before rooting your OnePlus X make sure you have done backup of all your data, contacts and apps and read the whole article first then start.
Here are the steps, do it carefully.
NOTE: Backup all your data as this procecc will format your phone memory.
A. Download files
- Java runtime (Skip this if your Windows PC already installed)
- Universal Android ADB Driver for Windows.
- ADB FASTBOOT FILES.zip
- TWRP custom recovery
- UPDATE-SuperSU-v2.46.zip
B. File Preparation
- Install Java runtime on your Windows PC( Skip if already installed)
- Install Universal Android ADB Driver
- Transfer SuperSu.zip file from your PC to Phone’s external memory card as internal will be formated
- Unzip ADB FASTBOOT FILES.Zip
- Now put the en-recovery-twrp-onyx-.img file inside the ADB FASTBOOT FILES folder
C. Phone Preparation
- Enable Android debugging by going to Settings > About phone and tapping on “Build number” 7 times
- Go to Settings > Developer options and check “Android debugging”
- Again, go into Developer Options and enable bootloader unlocking
D. Unlock Bootloader on OnePlus X
- Connect your Phone to PC via USB cable
- A dialogue box will appear.Just enable the check box “Always allow from this computer” then click ok
- Open the “ADB FASTBOOT FILES” folder
- Inside the folder, hold “Shift” Key then right click and select “Open command Windows here”
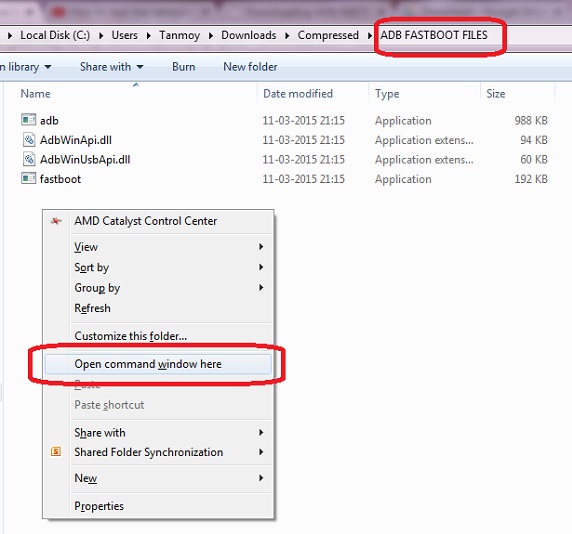
- The Command prompt will open
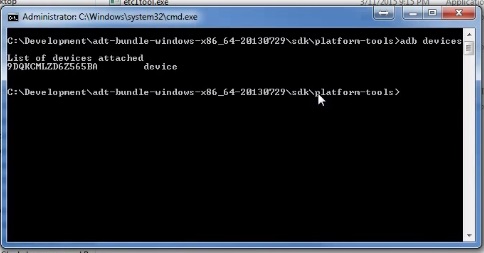
- Now on the command prompt, type this and hit enter.
adb devices
- If everything ok, it will show list of devices attached with some Alphanumeric character like this. If its not showing then install the driver again and restart your PC.
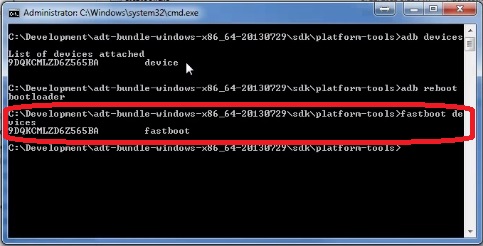
- Now type type this command and hit enter
adb reboot bootloader
- You will that phone will go to bootloader mode. Basically its fastboot mode.
- Now type this command and hit enter
fastboot devices
- If the driver working in fastboot mode, then command prompt will say fastboot like this
- Now unlock bootloader by typing this command
fastboot oem unlock
- The device will unlock the bootloader, erase all user data and reboot itself into Android.
- Don’t close the command prompt
E. Install TWRP Recovery and Root OnePlus X
- Again enable Android debugging by going to Settings > About phone and tapping on “Build number” 7 times
- Go to Settings > Developer options and check “Android debugging”
- Now switch off your phone
- Then simultaneously hold down the volume up + power buttons until it vibrates. When done correctly, you will see the words “Fastboot Mode” on a black screen.
- Connect your Phone to PC via USB
- Type this bellow command and hit enter (Make sure en-recovery-twrp-onyx-.img file is in ADB FASTBOOT FILES folder)
fastboot flash recovery en-recovery-twrp-onyx-.img
- Once it’s done, type this command and hit enter to boot into TWRP Recovery
fastboot boot en-recovery-twrp-onyx-.img
- Now you must make a backup of your stcok ROM, so click on Backup
- Then to backup ROM, check ON “Boot”, “System”, and “Data” . You can also set a Backup Name and choose either Internal Storage or your external micro-SD card.
- When done setting it up, simply swipe “Swipe to Back Up” to starting backing up ROM.
- This backup file is saved in Backup folder either internal or external, make a copy of this folder and keep in safe place like your PC. ( You can do this after rooting)
- Now you can root, to root go to the main menu of TWRP Recovery
- Click on “Install,” browse UPDATE-SuperSU-v2.XX.zip on the SD card, then flash it.
- Reboot the phone. It is now rooted!
- To whether you OnePlus X has root access or not, just go to Google play store and install Root Checker and run it.
Hope you have successfully rooted your OnePlus X, now if any OTA updates hit you just need to the stock ROM via TWRP Recovery that you made a backup in step 9 and 10. For anything else, write down your views.


Hi
Can u plz tell me how to root huawei honor 4x.
Thnks