
How To Root Nexus 6P And Install Custom Recovery [100% Working]
Google Nexus 6P manufactured by Huawai is one the best Android smartphone of 2015 in respective of its looks and specification and secondly its far better than it’s previous version Google Nexus 6 which I often consider as a Moto X series phone. Now if you are looking forward to do something on your Nexus 6P then rooting comes with first priority. So how to root Google Nexus 6P? Rooting method always differs from device to device, but in this post I am going share you how to root Nexus 6P in easiest way. Basically its One click Method. Let’s find out how to root Nexux 6P.

Before we are going to start rooting Nexus 6P, I will request you to know the pros and cons of rooting as I always say. Second of all you need make a backup of your device like apps, contacts, SMS and all your data. If you don’t know how to backup, then Google it, you will get tons of results. But make sure you have a backup on your PC.
Incase you completed the backup process, we can proceed to root Nexus 6P. Before you take any step read the whole article properly and then start.
How To Root Nexus 6P
A. Download Tool
Nexus Root Toolkit (51.7MB)
Install this software on your PC
B. Enable USB Debugging
- Go to Settings >> About Phone >> Tap the Build Number 7 times
- You will see a pop up that “You are a developer”
- Now go back to the Settings menu and tap on Developer Options
- Enable USB Debugging
C. Root Nexus 6P and install custom Recovery
- Connect your Nexus 6P to your PC
- Run Nexus Root Toolkit
- Now select the device and Android Build, you can also choose Auto detect option
- Now click on Apply
- In USB Connection setting uncheck MTP
- You will get a pop up on your device saying RSA fingerprint,
- Just check “Always allow from this computer” then tap on OK
- Once you have done this, click on Download + Update All File Dependencies to download the required files.
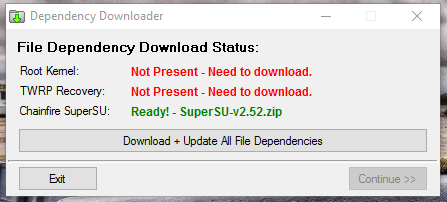
- Once all the files downloaded the toolkit will open like this
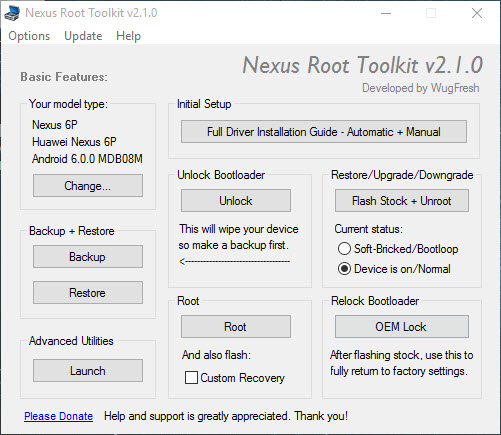
- First, click on Full Driver Installation Guide
- It will guide you how to install driver, just follow the instruction
- Once You have finished installing driver go back to main menu
- Now click the Unlock button under “Unlock Bootloader”, and follow the on-screen instructions. (This will format your internal memory)
- Now click on Root, if you want a Custom Recovery then just enable the custom Recovery check box and hit on Root.
- Now follow on screen instruction, this tool will root your Nexus 6P automatically.
For any question do comments here.